
Miscellaneous
Creating a one-page design
Section titled “Creating a one-page design”A one-page design, like the one-page demo, takes two steps:
- Create a page whose content rows have unique IDs.
- Create a navigation menu whose items point at those IDs.
Creating the page
Section titled “Creating the page”We recommend WPBakery Page Builder for this, because it makes the page much easier to manage.
-
Split your content into several rows. Give every row that the menu should scroll to its own row ID in the row settings.
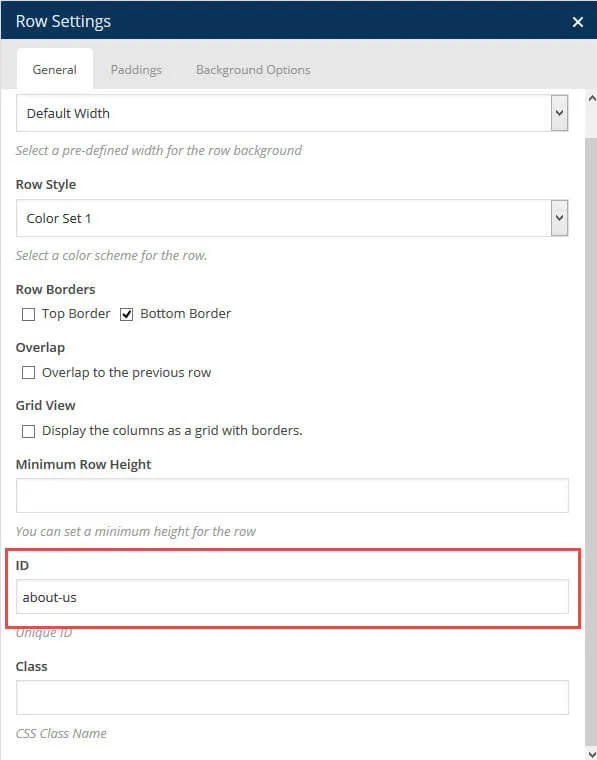
-
Create your menu and add a Custom Links item that points at the row ID, for example
#about.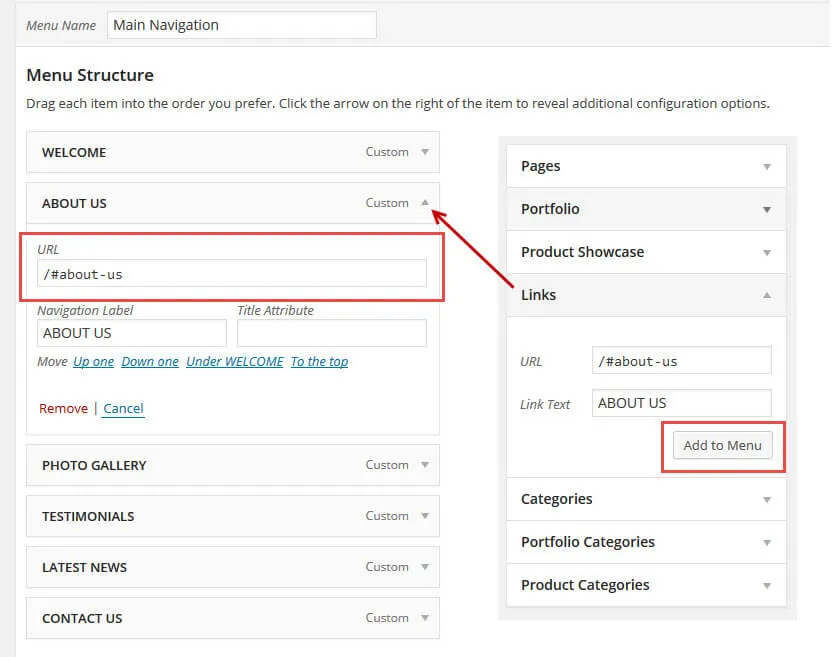
Important notes
Section titled “Important notes”RT-Theme 20 shortcodes
Section titled “RT-Theme 20 shortcodes”RT-Theme 20 comes with a large number of shortcodes. They add pre-designed content blocks to the content area of any page. You can also use some of them in a text widget or any other text area. WordPress runs a shortcode when the page is viewed on your site: a contact form shortcode, for example, shows a contact form where you placed it.
We built all the complex pages of the demo sites with RT-Theme 20 shortcodes. Complex shortcodes are hard to manage by hand, so the theme includes WPBakery Page Builder, which lets you change them with a drag-and-drop interface. Most of the shortcodes are also available as WPBakery Page Builder elements.
Editor mode
Section titled “Editor mode”In the Classic Editor, the editor has two modes: Visual and Text (called HTML in some languages). To insert shortcodes automatically, use the Visual mode.
The shortcode generator
Section titled “The shortcode generator”There are two ways to open the shortcode generator and insert a shortcode:
- In the Classic Editor, click the [</>] button above the editor (in Visual mode).
- Click </> Shortcodes in the WordPress admin bar.
Either one opens a pop-up with a list of the available shortcodes. The shortcode you select shows two or three sections:
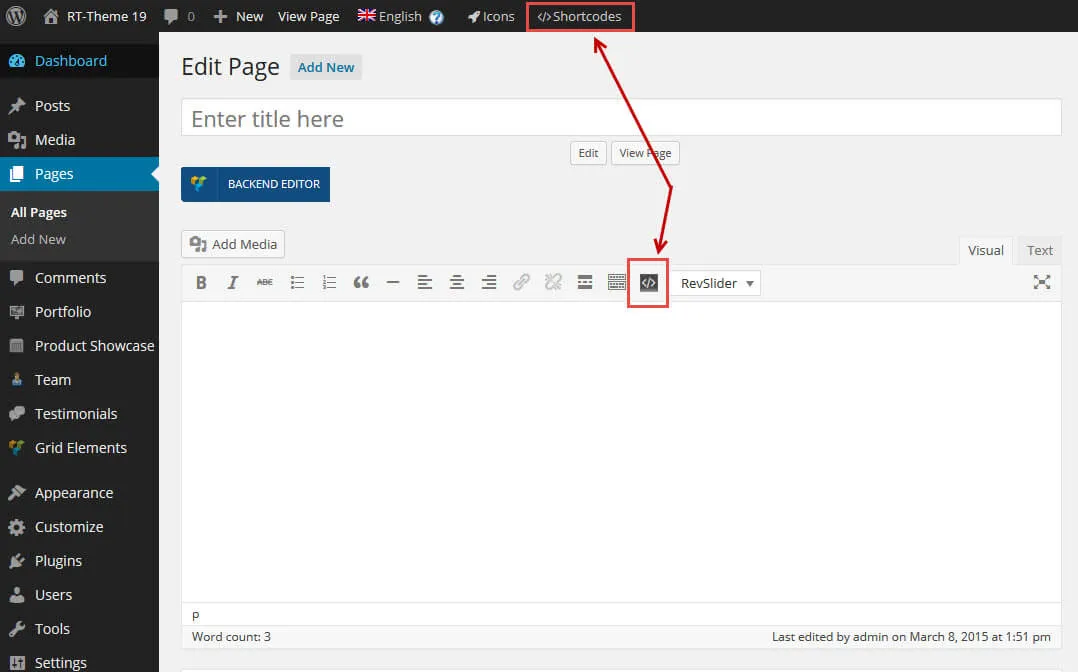
The shortcode window explained
Section titled “The shortcode window explained”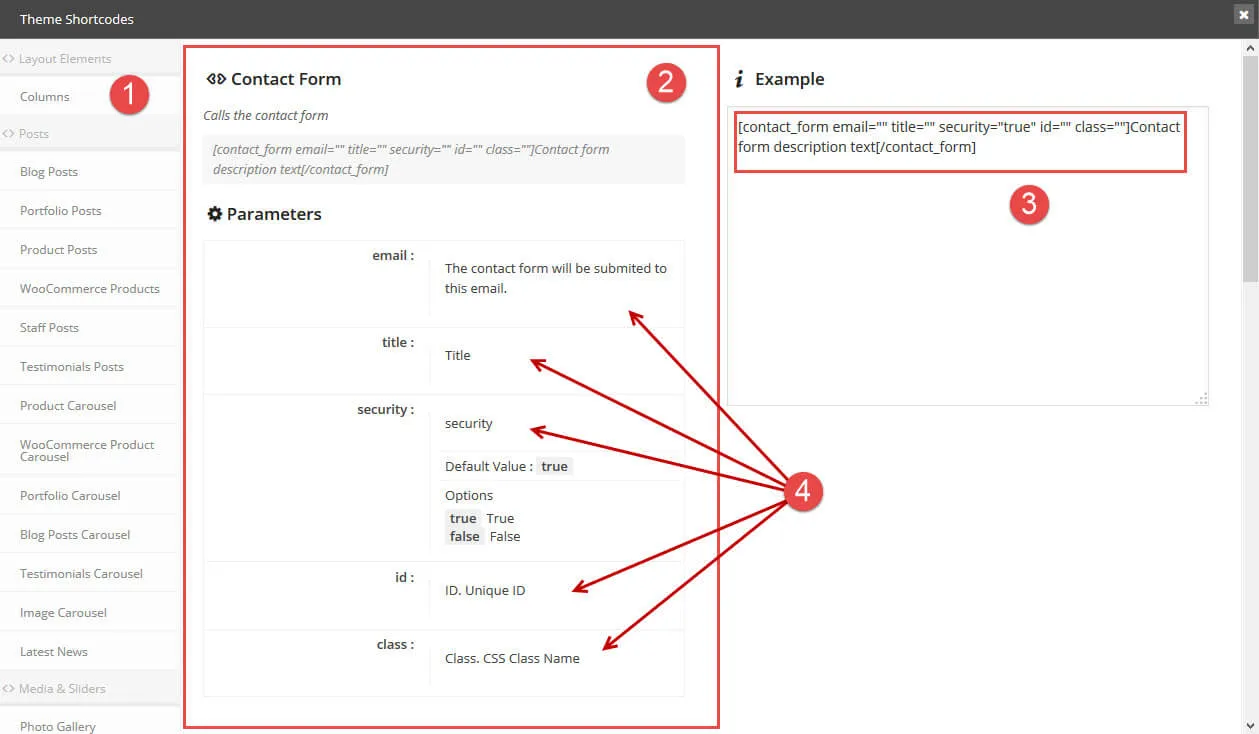
When you click the shortcodes button, a pop-up opens with:
- A list of the available shortcodes.
- A section on the left that explains the shortcode and its parameters.
- A section on the right with a ready-made shortcode. Adjust it with the parameters explained on the left. When you are done, select the shortcode, copy it and paste it into the page content, a text area or a text widget.
- Each parameter and its options. This list can be very long, depending on the shortcode you chose.
Adjust the parameters while the window is open, before you insert the shortcode (see also the icon help below). Once you copy the shortcode and close the window, paste it where you want it to run.
Theme icons
Section titled “Theme icons”RT-Theme 20 uses font icons. You call an icon by its CSS class name. Some shortcodes have a parameter such as icon="": put the icon’s class name between the quotes.
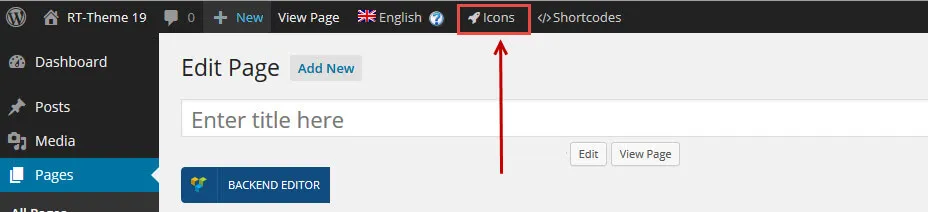
To find the right name and see what an icon looks like, click Icons in the WordPress admin bar. A preview list of all available icons opens. Narrow the list with its search field. When you find your icon, select its class name, copy it and paste it between the quotes of the icon="" parameter. The result is part of the shortcode, for example icon="icon-rocket".
Adding your own icons
Section titled “Adding your own icons”The theme’s icons are font based. We hand-picked them on the free Fontello service. With Fontello you can build your own icon set and use it with RT-Theme 20:
-
Create a child theme first (highly recommended). The package includes one,
rt-theme-20-child.zip. -
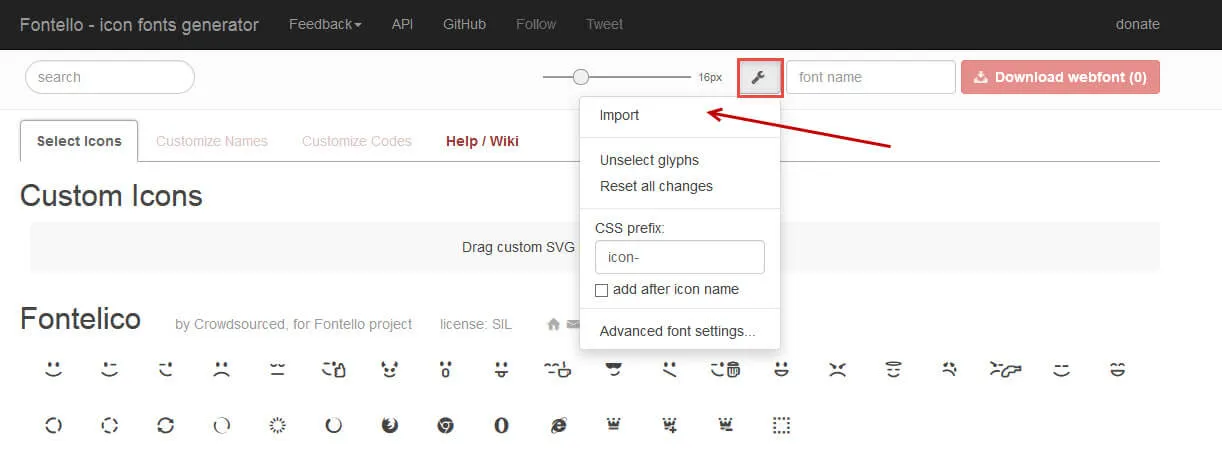
Go to the Fontello website and click the Import button.
-
Select the
config.jsonfile from the theme’srt-theme-20/css/fontello/folder. -
After the import, some icons are highlighted. Click other icons to add them, or add your own SVG files with the Custom Icons bar.
-
When you are ready, download the generated package and unzip it on your computer. Upload the
fontellofolder into thecssfolder of your child theme. Create thecssfolder if you do not have one.
Reload your admin and the new icons appear. A general guide is in Adding custom font icons.
Social icons
Section titled “Social icons”Adding your social profiles
Section titled “Adding your social profiles”Add your social profiles in the Customizer, under the global Social Media Options.
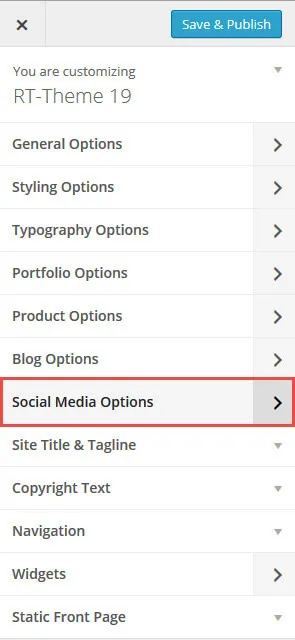
For every social icon you can set:
- Text: the text that appears when visitors hover over the icon.
- Link: the address the icon opens.
- Link Target: whether the link opens in the same window or a new tab.
To show the icons at the top of the page and in the footer, turn on the position toggles in the RT-Theme 20 Social Media Options. To show the icons anywhere else, add the social icons shortcode to any content area.
Every icon needs a valid link. The email and Skype icons take a special format, explained in Social Media on the Customizer page.
Footer content
Section titled “Footer content”Creating a footer navigation
Section titled “Creating a footer navigation”- Go to Appearance › Menus. Create a new menu, or use the default footer menu, and add your menu items as described in Navigations.
- Save the menu and assign it to the Footer Navigation location.
- View your site. The menu appears in the footer.
General help is in Creating menus.
Copyright text
Section titled “Copyright text”Set the copyright text in the Customizer. See Copyrights.
Footer widgets
Section titled “Footer widgets”The footer can hold widgets. Add them in the Customizer or under Appearance › Widgets, where you add a widget block to one of the footer widget areas. Widgets in the footer areas show in the footer columns on your site. The widget areas are explained in Widgets.
Custom fields in search results
Section titled “Custom fields in search results”By default, WordPress search does not look into the custom fields of the custom post types. The search results do not include any text you entered in those fields. To include them, use a plugin from wordpress.org, for example Custom Search Plugin or Custom Fields Search.
What you should know
Section titled “What you should know”A few things you may run into, or have a question about.
Colour sets in nested rows and columns
Section titled “Colour sets in nested rows and columns”When you choose different colour sets for nested rows and columns, the result may not be what you expect. This is because of the order in which the sets load in the CSS files: each set overrides the one before it, in the order of the set list. So Color Set 1 inside Color Set 3 may not work, because Color Set 1 loads before Color Set 3.
Bootstrap tables
Section titled “Bootstrap tables”Tables use the Bootstrap CSS. A table without the table class is not styled. You can copy example code from the Bootstrap table examples.
Missing WPBakery Page Builder elements
Section titled “Missing WPBakery Page Builder elements”The theme’s WPBakery Page Builder configuration file decides which WPBakery elements are available. Where it is and how to change it is explained in WPBakery Page Builder.
Missing Bootstrap elements
Section titled “Missing Bootstrap elements”We turned off some parts of the Bootstrap library. You can turn them on again by changing the SASS files that come with the theme, in the css/sass folder.
Turning off the theme’s custom post types
Section titled “Turning off the theme’s custom post types”You can turn off each custom post type of the theme with a filter. Add the code to the functions.php file of your child theme, so that a theme update does not remove it. Keep only the lines of the post types you want to turn off:
function rt_active() { return false;}add_filter( 'product_showcase_active', 'rt_active', 0 );add_filter( 'testimonials_active', 'rt_active', 0 );add_filter( 'team_active', 'rt_active', 0 );Slideshow images
Section titled “Slideshow images”When the blog list uses the masonry layout, slideshow images are always cropped.
White screen or Customizer not loading
Section titled “White screen or Customizer not loading”A blank screen after activating WPBakery Page Builder, or a Customizer that does not load, usually means the server runs out of PHP memory. See Raising the PHP memory limit.
Working with child themes
Section titled “Working with child themes”A child theme has its own Customizer settings. After you activate it, set the Customizer up again or import the settings you exported from the parent theme. See Child themes and Customizer settings.