
Installing
Thank you for choosing RT-Theme 19. This page takes you from the download to a working site: installing the theme, installing the bundled plugins, importing the demo content and keeping everything up to date.
Downloading RT-Theme 19
Section titled “Downloading RT-Theme 19”Download the theme from the Downloads page of your ThemeForest account and choose All files and documentation. The general steps are in Installing a theme.
Unzip the package on your computer. It holds the installable theme file rttheme19.zip, the documentation, a sample child theme and the Demo Contents folder.
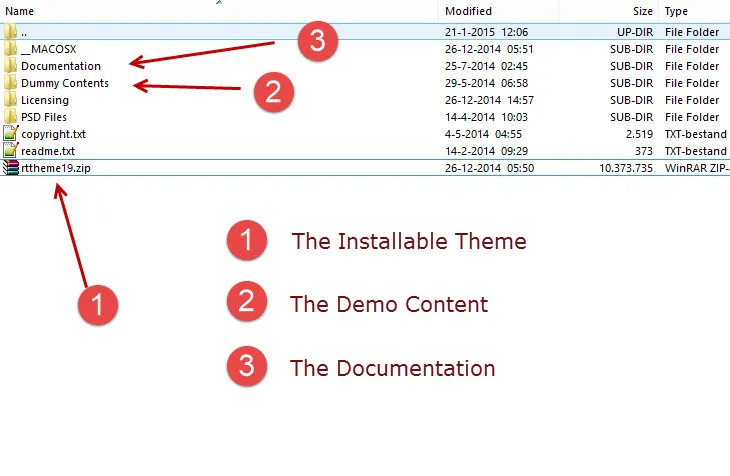
Two ways to install the theme
Section titled “Two ways to install the theme”You can install the theme in two ways:
- Upload the
rttheme19folder by FTP intowp-content/themes. - Upload
rttheme19.zipwith the theme upload in the WordPress admin.
The upload in the WordPress admin is the easier one. Both are explained in detail in Installing a theme.
Uploading the theme by FTP
Section titled “Uploading the theme by FTP”-
Unzip
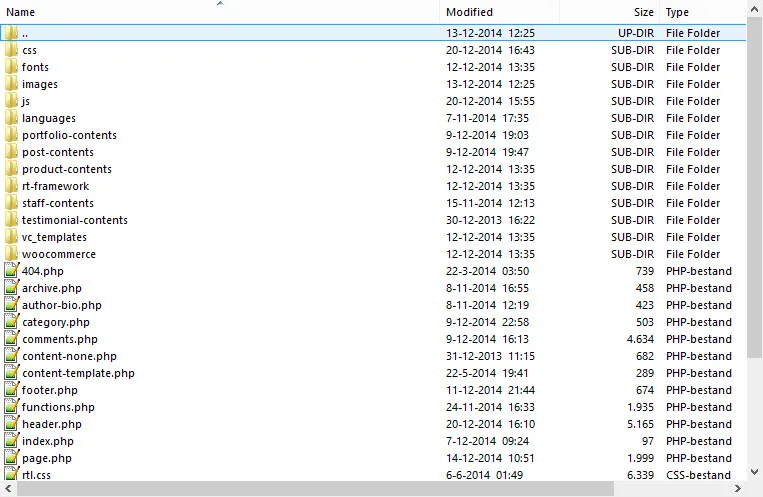
rttheme19.zipfrom the download package. You get arttheme19folder.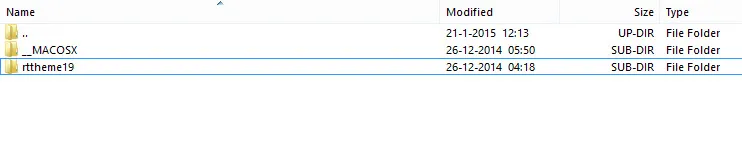
-
Connect to your server with an FTP program such as FileZilla or WinSCP.
-
Upload the
rttheme19folder with all its subfolders intowp-content/themes, so that you getwp-content/themes/rttheme19.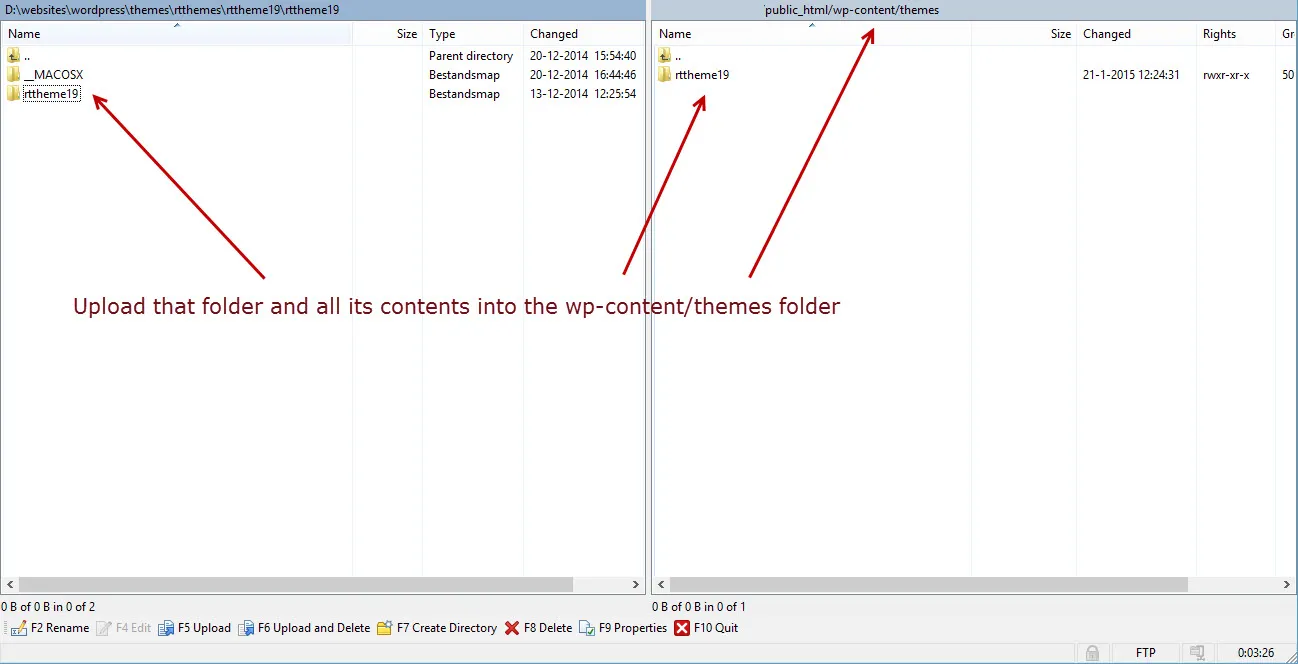
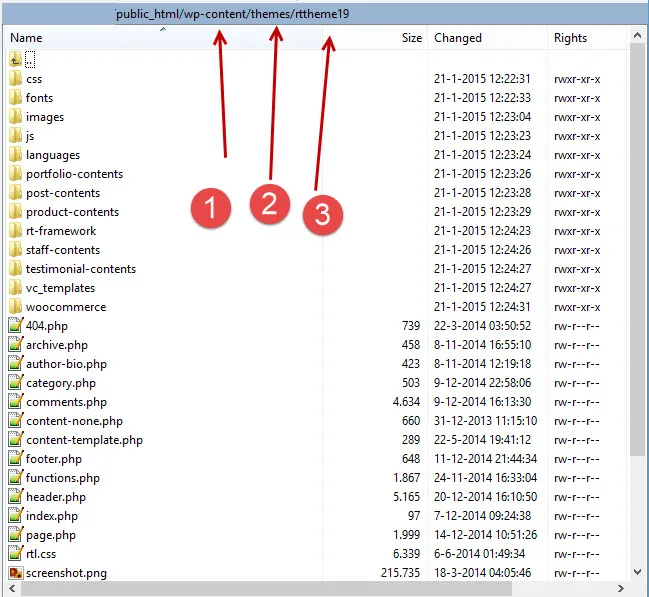
-
Log in to WordPress, go to Appearance › Themes, hover over RT-Theme 19 and click Activate.
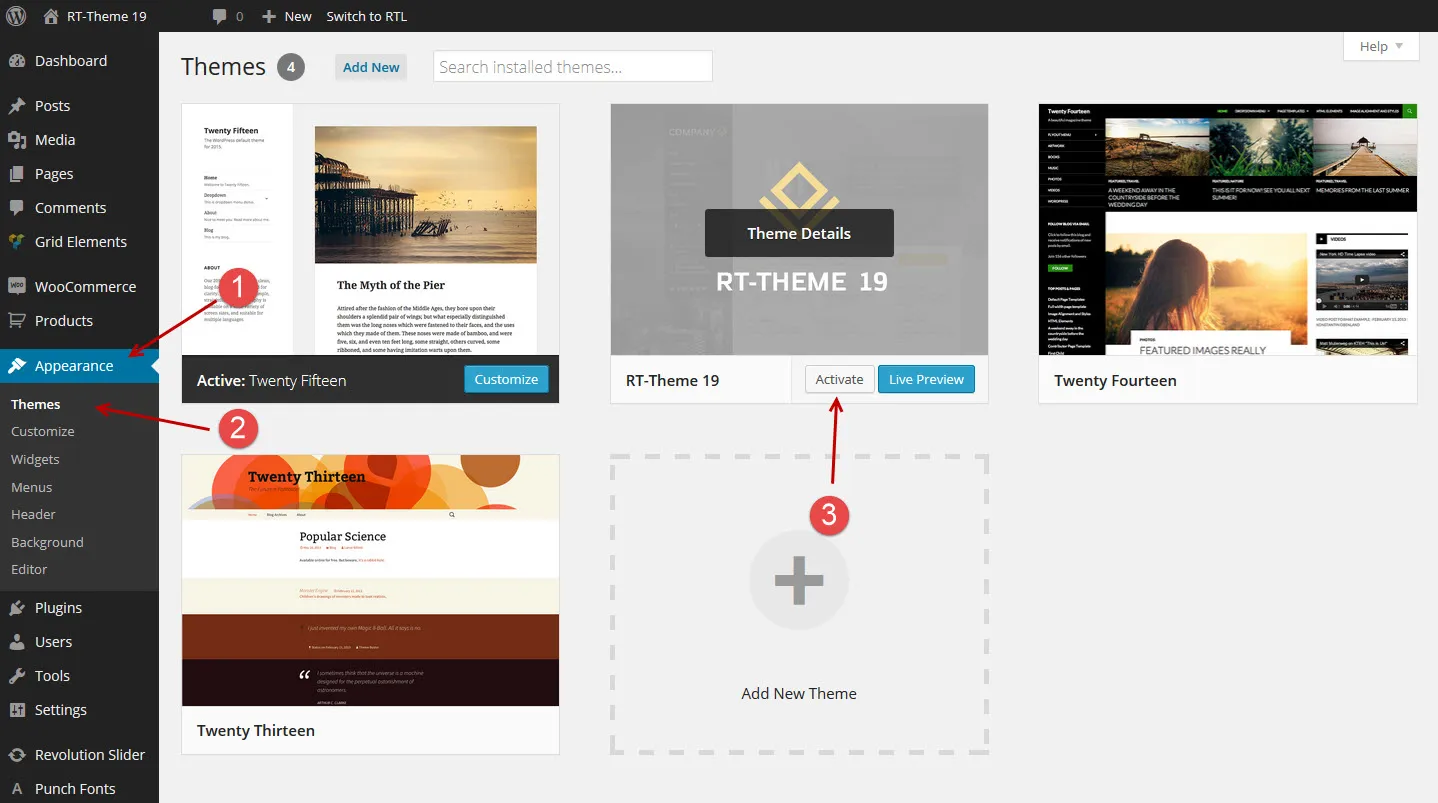
Uploading the theme in WordPress
Section titled “Uploading the theme in WordPress”-
Go to Appearance › Themes and click Add New Theme.
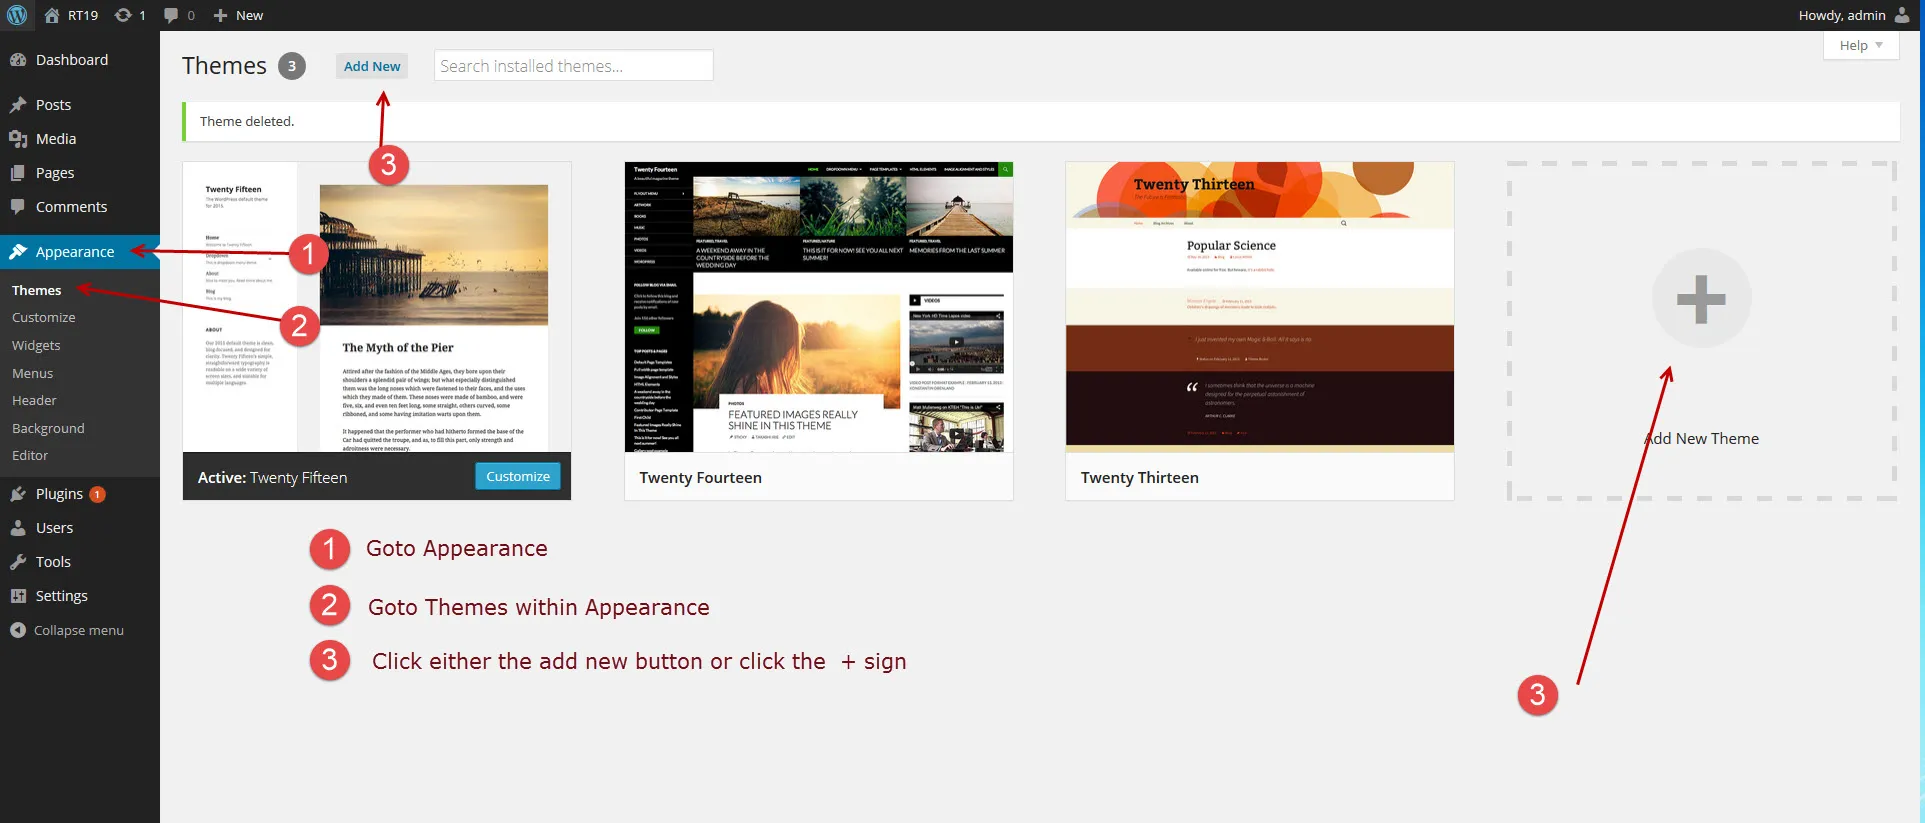
-
Click Upload Theme.
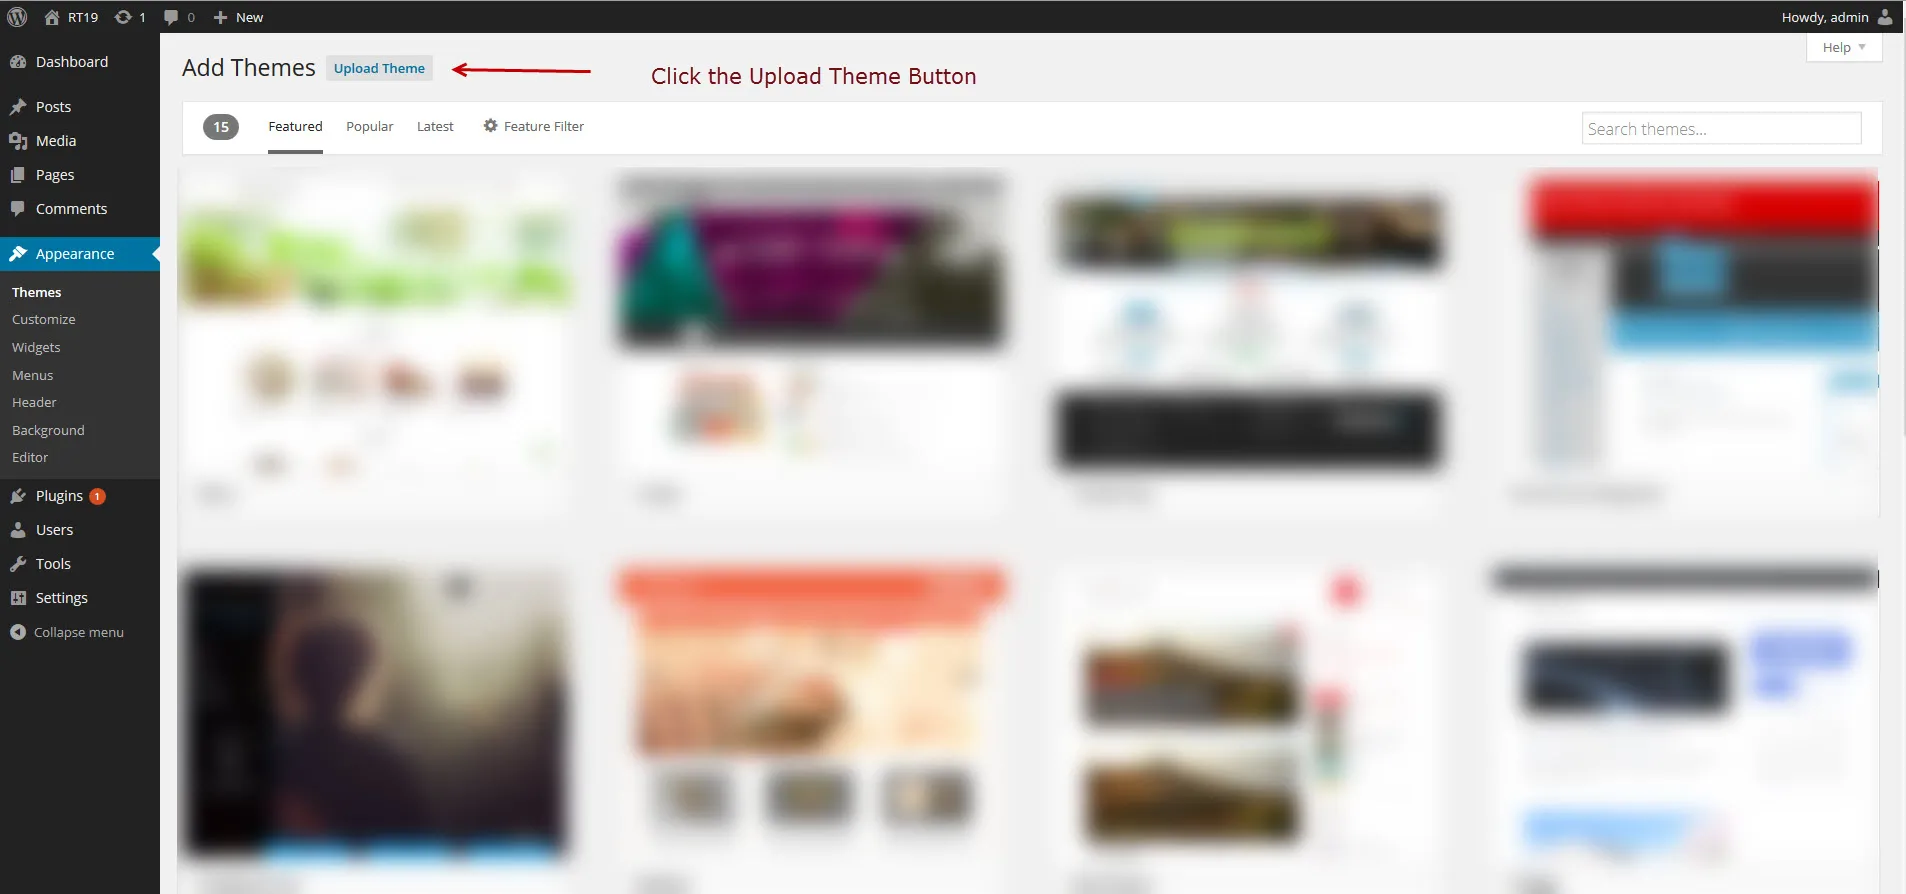
-
Choose
rttheme19.zipfrom the download package and click Install Now. -
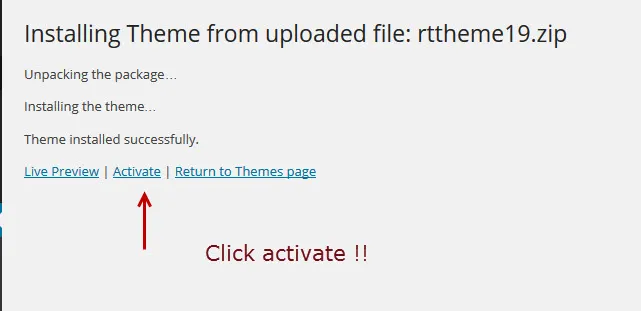
When WordPress reports that the theme is installed, click Activate.
-
If you left that screen without activating, go to Appearance › Themes, hover over RT-Theme 19 and click Activate.
Licence activation
Section titled “Licence activation”Activate your licence to receive theme updates, install the bundled plugins and import the demo content.
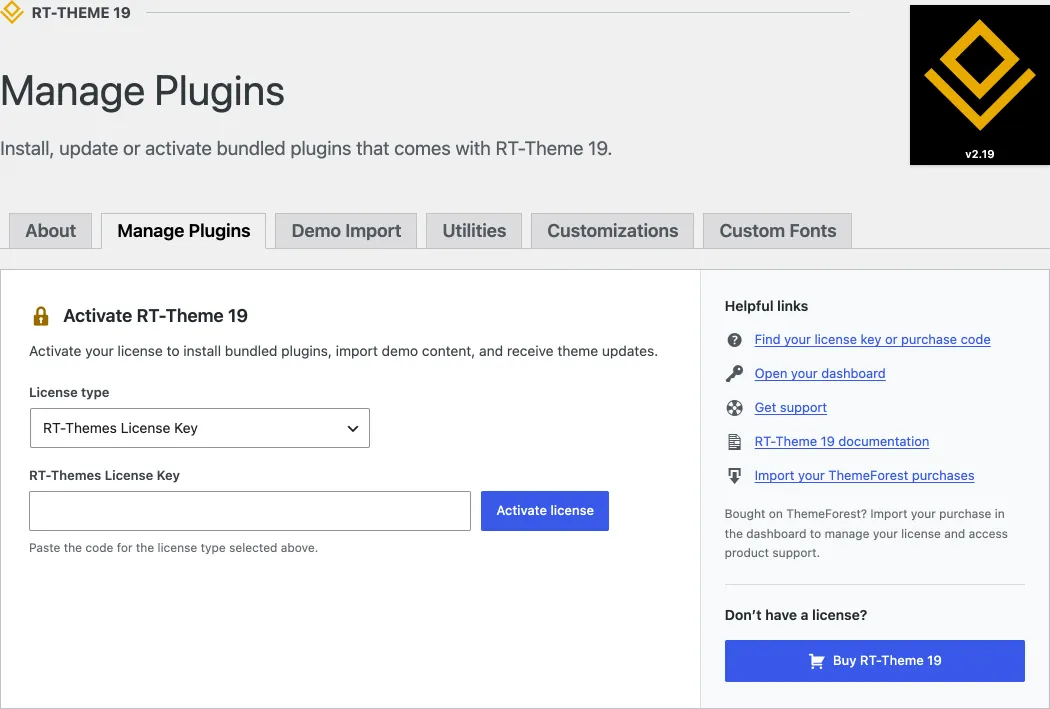
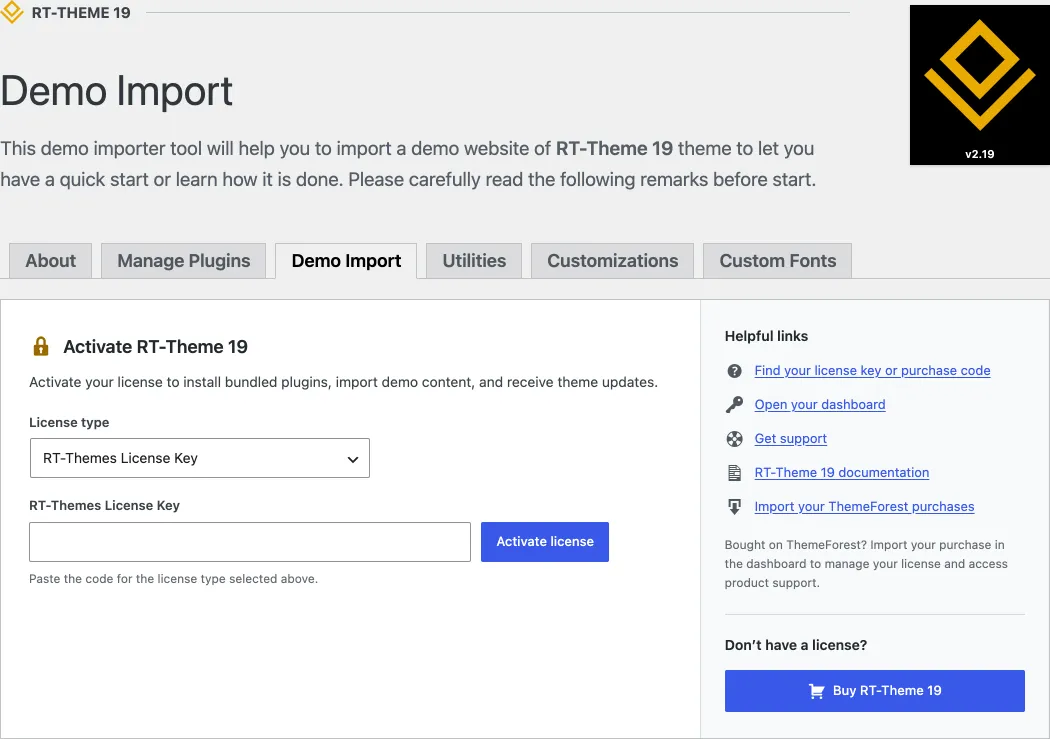
- Open RT-Theme 19 › Plugins in your admin sidebar. Until the licence is active, the Manage Plugins tab, like every other tab of the theme’s About page, shows the Activate RT-Theme 19 form.
- Choose the License type: RT-Themes License Key for a direct purchase or a Club License Code, or Envato Purchase Code for a ThemeForest purchase.
- Paste your key or purchase code in the field below it.
- Click Activate license. Theme updates, the bundled plugins on the Manage Plugins tab and the one-click demo import are now available.
Finding your license key or purchase code explains where to find your key or code. To activate the licence on another site or move it, see Requesting license activation or deactivation. If the activation fails, see Troubleshooting license activation.
Installing the bundled plugins
Section titled “Installing the bundled plugins”RT-Theme 19 comes with three bundled plugins:
- RT-Theme 19 Extensions (required): the four custom post types, Portfolio, Product Showcase, Team and Testimonials, and the theme’s shortcodes and page builder elements.
- WPBakery Page Builder: the drag-and-drop page builder.
- Slider Revolution: the slider plugin for complex slide animations. It is optional.
Install and update them from the theme’s own admin menu:
- Go to RT-Theme 19 › Plugins and open the Manage Plugins tab.
- Make sure your licence is active (see Licence activation). The bundled plugins can only be installed with an active licence. Until it is active, the tab shows the Activate RT-Theme 19 form instead of the plugins.
- Install and activate each plugin you need.
Some plugins may be free plugins that you can also update from the regular Plugins screen. The theme extension and the premium plugins can only be installed and updated from Manage Plugins. The whole workflow is explained in Bundled plugins.
Manually install / update bundled plugins
Section titled “Manually install / update bundled plugins”If the Manage Plugins tool does not work for you, install or update the plugins by hand.
- Download the theme ZIP file from the Downloads page of your ThemeForest account and unzip it on your computer.
- In WordPress, go to Plugins › Add New Plugin and click Upload Plugin.
- Choose the plugin ZIP file from the
rttheme19/rt-framework/plugins/packages/folder:rt19-extentions.zip,js_composer.ziporrevslider.zip. - Click Install Now. If WordPress asks, confirm Replace current with uploaded.
- Repeat this for each bundled plugin.
Installing the extension plugin
Section titled “Installing the extension plugin”The RT-Theme 19 Extensions plugin must be installed and active. It holds the custom post types and the shortcodes, and the demo content needs it for a correct import. Install it from the Manage Plugins tab described above.
The Install Plugins screen
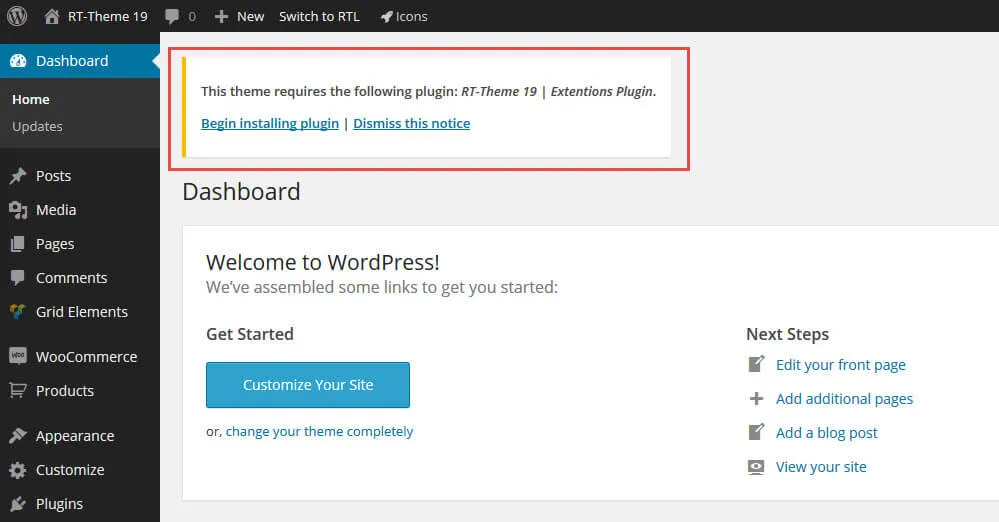
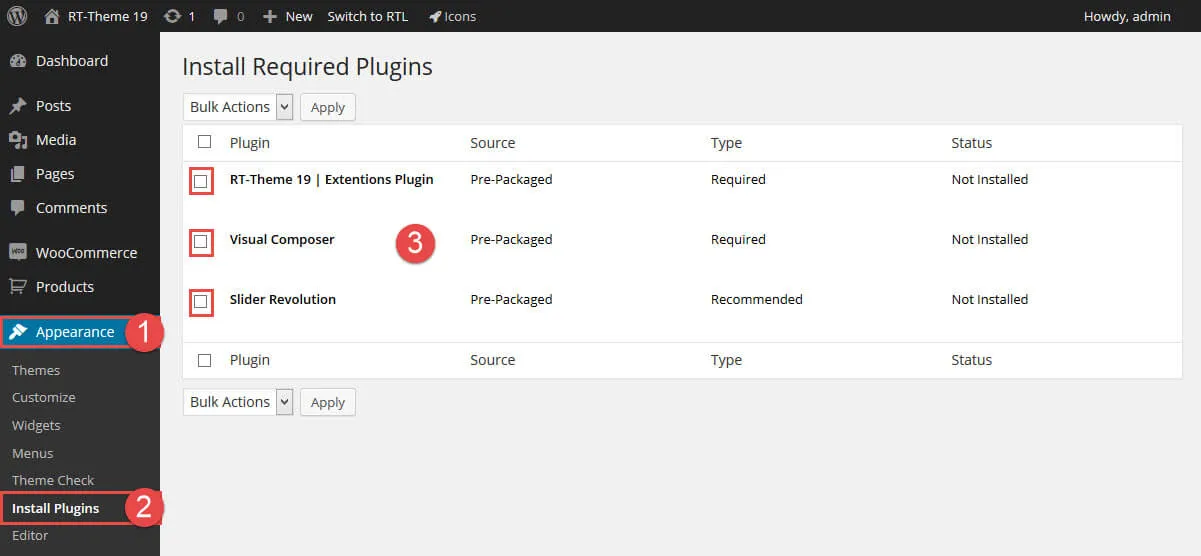
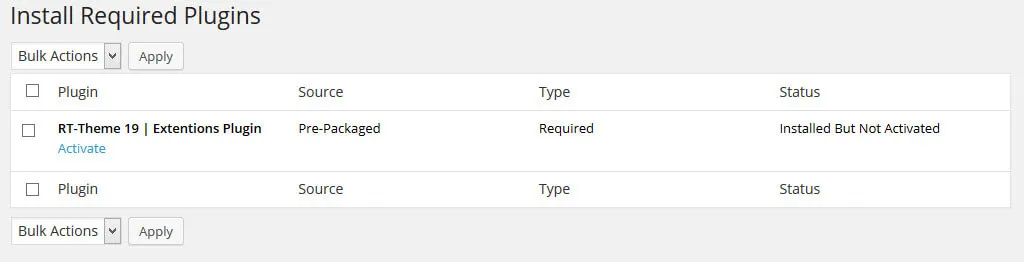
Section titled “The Install Plugins screen”If you cannot reach the Manage Plugins tab, use Appearance › Install Plugins as a fallback. The screenshots below show this screen in an older version of WordPress. Older versions of the theme also showed an admin notice with a “Begin installing plugins” link, which no longer appears.
- Go to Appearance.
- Click Install Plugins.
- Install a plugin with its own link, or select several and use the bulk install action.
Activating an installed plugin
Section titled “Activating an installed plugin”If a bundled plugin is installed but not active, it is listed under Appearance › Install Plugins. Hover over it and click Activate.
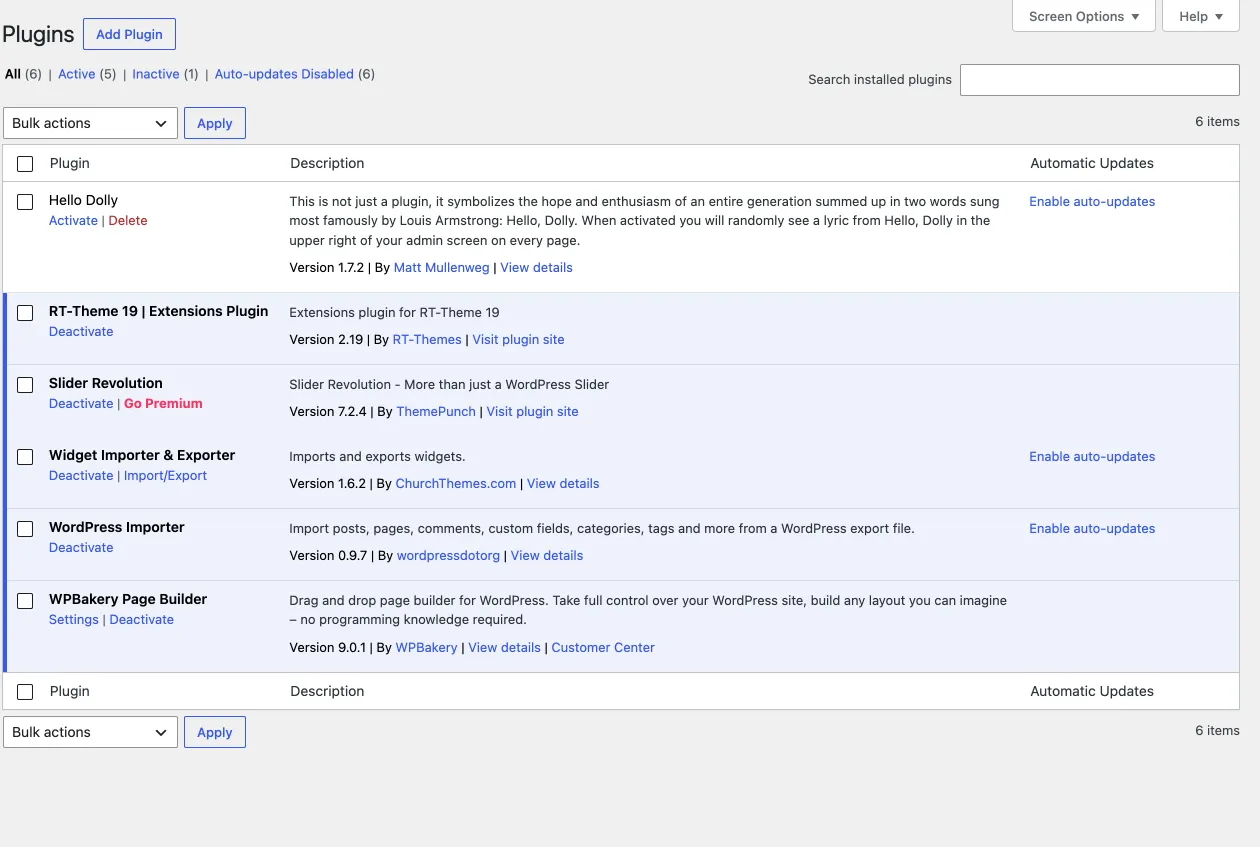
You can also activate an installed plugin on the Plugins screen of WordPress.
Installing the demo content
Section titled “Installing the demo content”This step is optional. Import the demo content if you want to start from one of the demo sites. You can import it in two ways:
- With the Demo Import page of the theme. This is the easiest way.
- By hand, with the WordPress importer and the files in the download package.
One-click demo import
Section titled “One-click demo import”Go to RT-Theme 19 › Demo Import, choose a demo and follow the steps on the screen. The page downloads the demo from rtthemes.com, so it needs your activated licence key: until the key is active, the page shows the activation form instead of the demos. The general steps are in Importing demo content.
Manual import
Section titled “Manual import”The Demo Contents folder of the download package holds the same content as files, for thirteen demos:
Contents/Demo 1toContents/Demo 13: acontents.xmlfile for each demo.RevSlider/Demo N/: the Slider Revolution sliders of each demo, as ZIP files.Widgets/Demo N/: the widgets of each demo, as a.wiefile.WooCommerce/woo-products.xml: the sample WooCommerce products.Contact Form 7/contact-form-7-samples.xml: the sample contact forms. Install Contact Form 7 from wordpress.org before you import them.
Importing the content
Section titled “Importing the content”Before you start:
- Activate the RT-Theme 19 Extensions plugin to get the Portfolio, Product Showcase, Team and Testimonials content. For the sample WooCommerce products, activate WooCommerce.
- Install and activate the WordPress Importer plugin.
Then:
- Go to Tools › Import and click WordPress.
- Choose the
contents.xmlfile of the demo you want from theDemo Contentsfolder. - Click Upload file and import and follow the steps on the screen.
Importing the demo widgets
Section titled “Importing the demo widgets”You can also import the widgets used on the demo sites.
- Install the free Widget Importer & Exporter plugin.
- Go to Tools › Widget Importer & Exporter and choose the
.wiefile of your demo from theWidgetsfolder ofDemo Contents. - Click Import Widgets.
Activating the skin of your choice
Section titled “Activating the skin of your choice”After the import, you can switch the theme to any of the ready-made skins. Go to Appearance › Customize › Styling Options, open the pre-made skins and activate the one you want. Click Publish.
Importing the Slider Revolution samples
Section titled “Importing the Slider Revolution samples”You can import the demo sliders to start from a finished design. The full instructions are in the Slider Revolution documentation.
- Go to Slider Revolution in the admin menu and click Import Slider.
- Choose the slider ZIP file from the
RevSliderfolder ofDemo Contentsin the All files and documentation package.
Updating
Section titled “Updating”Once your licence is activated, WordPress tells you when an update of the theme is available. An update has two steps:
- Update the theme.
- Update the bundled plugins.
The general steps are in Updating a theme.
Updating the theme
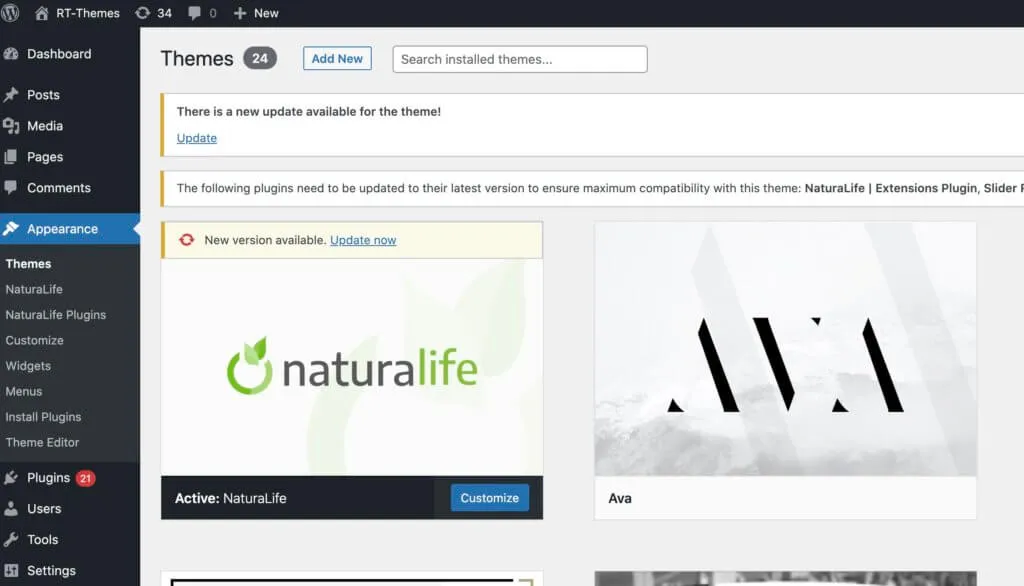
Section titled “Updating the theme”Go to Appearance › Themes and click Update now on the theme thumbnail.
Troubleshooting
Section titled “Troubleshooting”- If you do not see Update now, go to Dashboard › Updates to make WordPress check for updates.
- On a WordPress multisite network, you or the network administrator need to update the theme manually.
- If you have connection problems, deactivate your security plugin, update, then activate it again.
- You can also update the theme manually by following the installation steps above.
Updating the bundled plugins
Section titled “Updating the bundled plugins”Go to RT-Theme 19 › Plugins and open the Manage Plugins tab. Some plugins may be free plugins that you can also update from the regular Plugins screen. The theme extension and the premium plugins can only be installed and updated from this tab. The update buttons only show once your licence key is active; until then the tab shows the activation form.
Troubleshooting
Section titled “Troubleshooting”- If the Manage Plugins tool does not work for you, update the plugins manually.
- Make sure your user account is allowed to install and update plugins.
Video: installing the demo content
Section titled “Video: installing the demo content”The installation video is no longer available. To import the demo content, use RT-Theme 19 › Demo Import as described in Installing the demo content.
Bundled third-party plugins
Section titled “Bundled third-party plugins”RT-Theme 19 comes with two third-party plugins, for which we bought extended licences:
- WPBakery Page Builder
- Slider Revolution
Things to know about the bundled plugins
Section titled “Things to know about the bundled plugins”- With WPBakery Page Builder you build the page content visually: you drag elements into place, and each element has its own settings. The plugin must be active for this.
- Read the WPBakery Page Builder documentation or watch the WPBakery Page Builder video tutorials to learn how it works.
- With Slider Revolution you build responsive sliders with layers of text, video and images. See the Slider Revolution documentation.
- We update these plugins to their latest stable versions with the theme updates.
- We fix problems with these plugins inside our theme, but not problems in the plugins themselves, and we cannot teach how they work. For direct help from their developers, you need your own licence of the plugin.
Requirements
Section titled “Requirements”RT-Theme 19 needs PHP 8.2.35 or newer and a current WordPress release. If uploads, the demo import or saving a page fail, raise the PHP memory limit and upload size as explained in Raise the PHP memory limit and upload size.