
Installing
Installing the theme
Section titled “Installing the theme”Thank you for purchasing BusinessLounge. Before you build your new site, install the theme: download the package from your ThemeForest account, unzip it on your computer and upload the theme ZIP to WordPress.
Downloading BusinessLounge from ThemeForest
Section titled “Downloading BusinessLounge from ThemeForest”- Log in to your ThemeForest account.
- Go to your Downloads page.
- Click Download next to BusinessLounge and choose All files and documentation.
Package contents
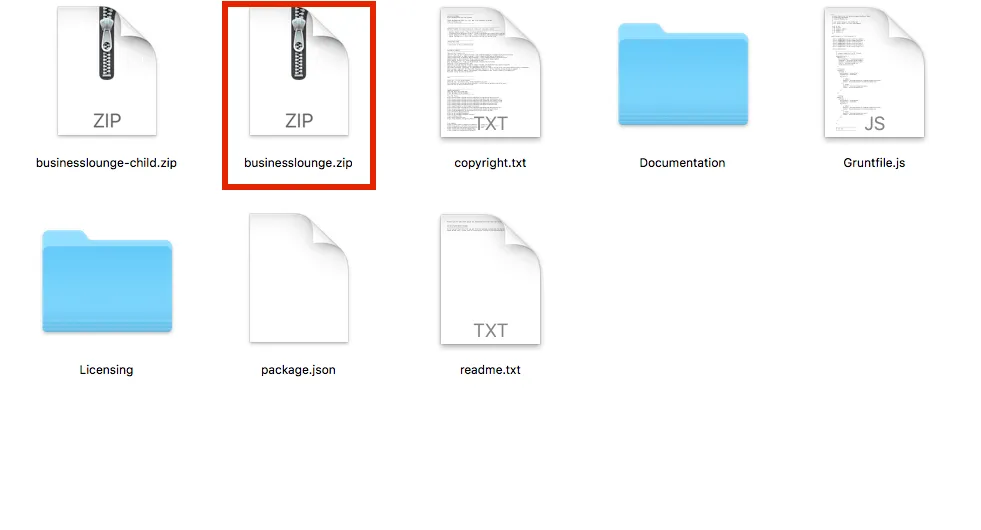
Section titled “Package contents”Unzip the downloaded package on your computer. It contains:
businesslounge.zip: the theme. This is the file you install in WordPress.businesslounge-child.zip: a child theme, for when you want to change the theme’s files.Demo Contents: the demo content files for a manual import (see Installing the demo contents).Documentation,Licensing,copyright.txtandreadme.txt.
Uploading the theme
Section titled “Uploading the theme”You can install the theme in two ways:
- Upload
businesslounge.zipin your WordPress admin: go to Appearance › Themes, click Add New Theme, then Upload Theme, choose the file and click Install Now. - Upload the unzipped
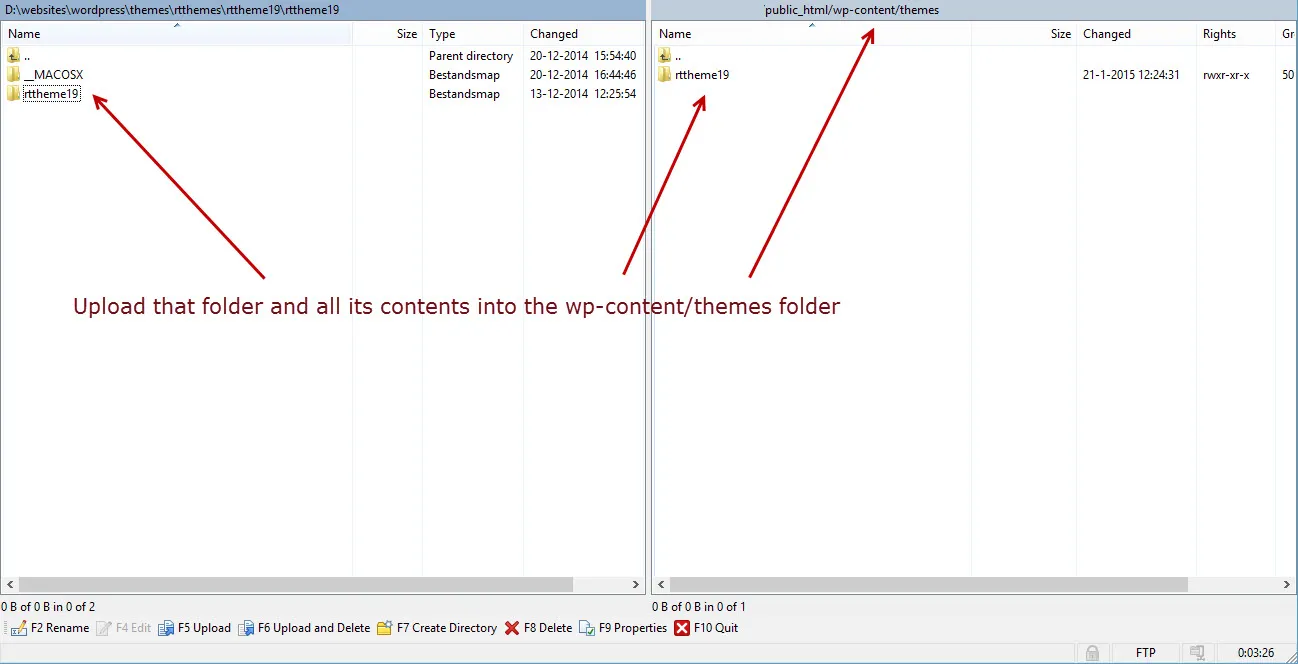
businessloungefolder with an FTP program intowp-content/themes, so that you havewp-content/themes/businesslounge.
Installing an RT-Themes WordPress theme explains both ways step by step, including what to do when the upload in WordPress fails because of the server’s upload size limit or security settings.
Activating the theme
Section titled “Activating the theme”Go to Appearance › Themes and click Activate under BusinessLounge.
Uploading the theme with FTP
Section titled “Uploading the theme with FTP”For an FTP upload, unzip businesslounge.zip first. Connect to your server with an FTP program such as FileZilla or WinSCP. Upload the businesslounge folder with all its subfolders into wp-content/themes.
Install and setup video
Section titled “Install and setup video”This video shows how to install the theme and the plugins and how to import the demo content. Watch it in full screen at 720p. The video has no audio.
Watch the BusinessLounge install and setup video
Licence activation
Section titled “Licence activation”Activate your licence to receive theme updates, install the bundled plugins and import the demo content.
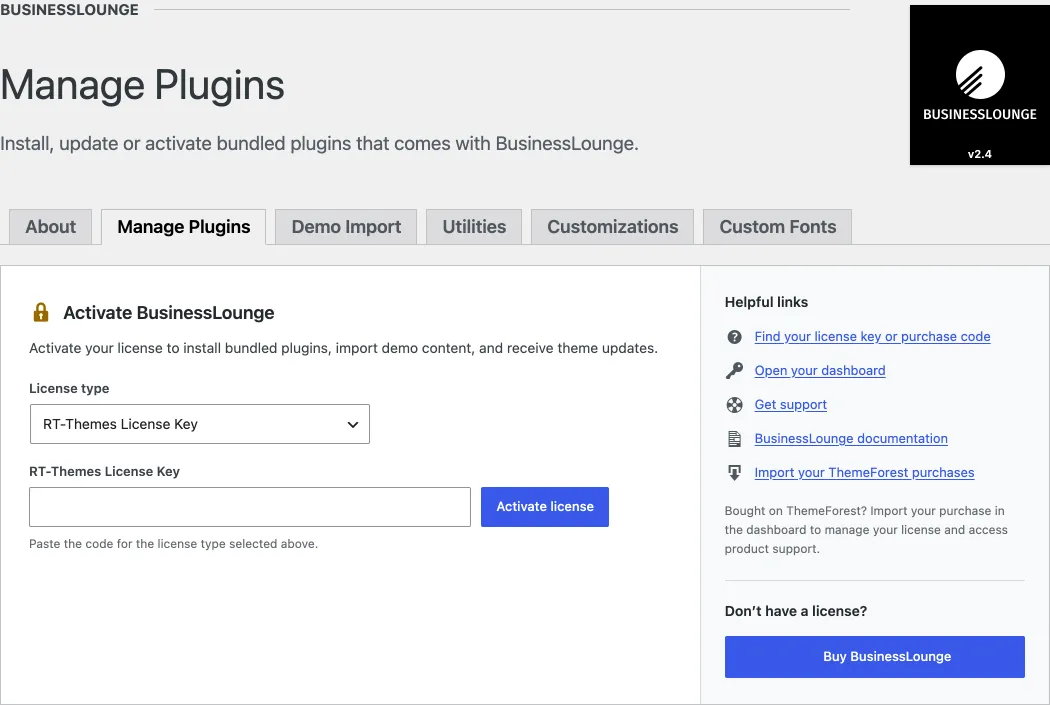
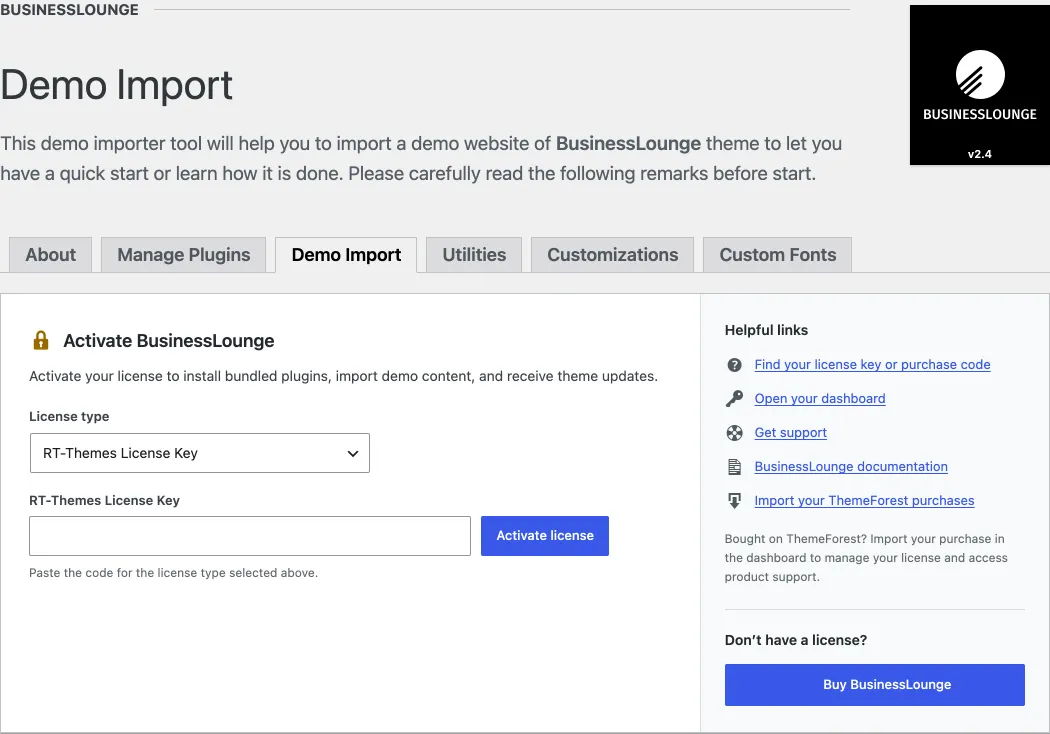
- Open BusinessLounge › Plugins in your admin sidebar. Until the licence is active, the Manage Plugins tab, like every other tab of the theme’s About page, shows the activation form.
- Choose the License type: RT-Themes License Key for a direct purchase or a Club License Code, or Envato Purchase Code for a ThemeForest purchase.
- Paste your key or purchase code in the field below it.
- Click Activate license. Theme updates, the bundled plugins on the Manage Plugins tab and the one-click demo import are now available.
Finding your license key or purchase code explains where to find your key or code. To activate the licence on another site or move it, see Requesting license activation or deactivation. If the activation fails, see Troubleshooting license activation.
Installing the bundled plugins
Section titled “Installing the bundled plugins”Go to BusinessLounge › Plugins and open the Manage Plugins tab to install, activate and update the plugins that come with the theme. Installing them there needs an active licence (see Licence activation). Free plugins such as Elementor and Contact Form 7 can also be updated from the normal Plugins screen, but the BusinessLounge Extensions plugin and the premium plugins install and update only from Manage Plugins.
Until the licence is active, the Manage Plugins tab shows only the licence form.
Manually install or update bundled plugins
Section titled “Manually install or update bundled plugins”If the Manage Plugins tool does not work for you, install or update the plugins by hand. Installing bundled plugins describes the workflow.
- Download the theme package from the Downloads page of your ThemeForest account and extract it on your computer.
- In your admin, go to Plugins › Add New Plugin and click Upload Plugin.
- Choose a plugin ZIP file from the
businesslounge/rt-framework/plugins/packagesfolder of the extracted theme and click Install Now. - When WordPress asks, confirm Replace current with uploaded.
- Repeat for each bundled plugin.
Bundled and recommended plugins
Section titled “Bundled and recommended plugins”BusinessLounge works with these plugins:
- BusinessLounge Extensions (required): adds the portfolio, team and testimonial post types and many shortcodes. It ships with the theme and must be installed and activated separately.
- Elementor (recommended): the main page builder. Free, from wordpress.org.
- WPBakery Page Builder (optional): the alternative page builder. Bundled.
- Slider Revolution (optional): bundled.
- Contact Form 7 (optional): free, from wordpress.org. WooCommerce is also recommended if you run a shop.
Elementor and WPBakery Page Builder are both page builders. You do not need to install both. We use and recommend Elementor for complex layouts such as the demo home pages. See Bundled Plugins for the licences.

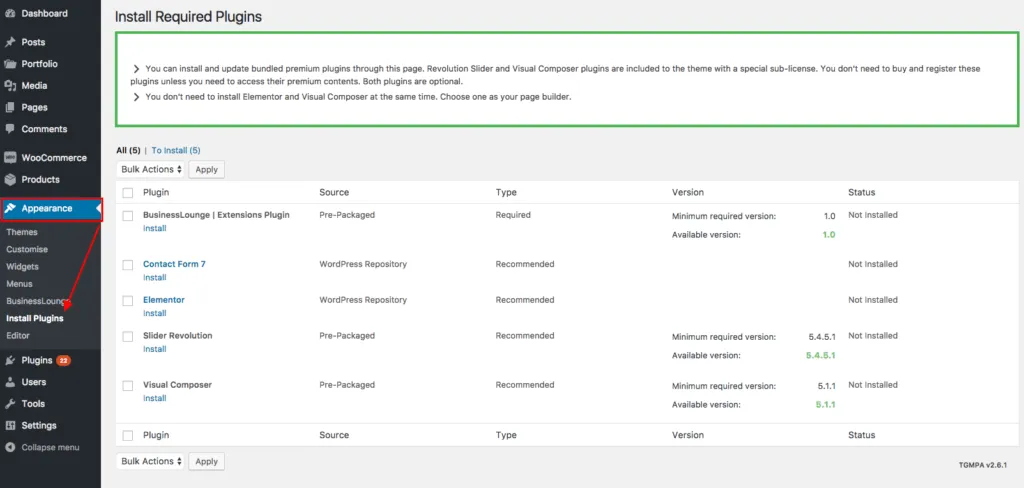
Older versions of the theme showed the notice above after activation. Current versions no longer show it: use the Manage Plugins tab described above.
Installing the extension plugin
Section titled “Installing the extension plugin”If the Manage Plugins tab is not available, use Appearance › Install Plugins as a fallback. Select the plugins for a bulk installation, or click Install under each plugin name.
Installing the demo contents
Section titled “Installing the demo contents”One-click demo import
Section titled “One-click demo import”Go to BusinessLounge › Demo Import and follow the instructions on the screen. The importer downloads the demo content from rtthemes.com, so it needs an active licence. Choose which parts to import and which page builder the demo pages should use, Elementor or WPBakery Page Builder.
- The newsletter subscription forms need Contact Form 7. If you want those forms, install and activate the plugin before you start the import.
- Always import into a clean WordPress install. The demo import adds media, posts, settings and menus, and replaces your menus with the demo menus.
- Do not interrupt the import: do not click Start Importing more than once and do not close the page.
Until your licence is active, the Demo Import tab shows only the licence form instead of the import options.
Manually import the contents
Section titled “Manually import the contents”The Demo Contents folder of the All files and documentation package holds the same content as files:
| File | What it contains |
|---|---|
All Demo Contents/Elementor/all-contents.xml | All demo pages and posts, built with Elementor |
all-contents.xml in the other folder of All Demo Contents | The WPBakery version of the same content. The folder still carries the plugin’s old name. |
WooCommerce/woocommerce-products.xml | The demo shop products |
Forms/contact-form-7.xml | The sample Contact Form 7 forms |
Rev Slider/business-lounge-1.zip to business-lounge-4.zip | The demo sliders |
Widgets/widgets.wie | The demo widgets |
Import the XML files with Tools › Import › WordPress, and the widgets file with the Widget Importer & Exporter plugin. Import only one of the two all-contents.xml files, the one for your page builder. Importing demo content into an existing site safely explains the import steps.
Manually import the demo sliders
Section titled “Manually import the demo sliders”The demo import installs the demo sliders. If you need them separately, import them into Slider Revolution:
- In your admin, open Slider Revolution and click Import Slider.
- Choose a slider ZIP file from the
Demo Contents/Rev Sliderfolder of the All files and documentation package.
See the Slider Revolution documentation for details.
Updating
Section titled “Updating”When your licence is active, WordPress tells you when a theme update is available. An update has two steps:
- Update the theme.
- Update the bundled plugins.
Updating an RT-Themes WordPress theme covers backups and the safe order of the steps.
Updating the theme
Section titled “Updating the theme”Go to Appearance › Themes and click Update now on the theme.
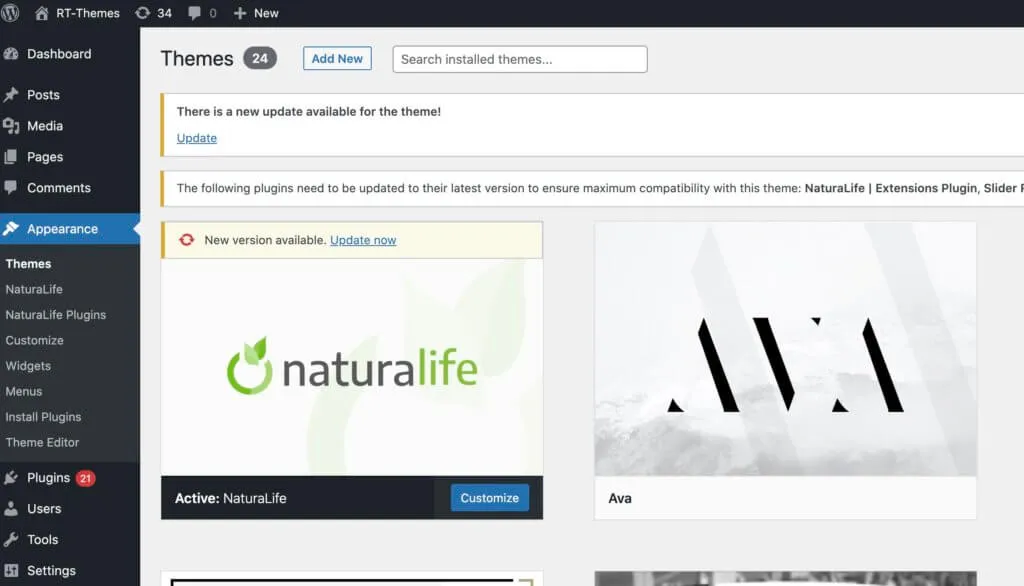
If you do not see Update now, open Dashboard › Updates so that WordPress checks for updates. On a Multisite network, the network administrator updates the theme. If the connection fails, turn off your security plugin during the update, or update the theme by hand by installing it again.
Updating the bundled plugins
Section titled “Updating the bundled plugins”Go to BusinessLounge › Plugins and open the Manage Plugins tab. The free plugins can also be updated from the normal Plugins screen, but the BusinessLounge Extensions plugin and the premium plugins update only here.
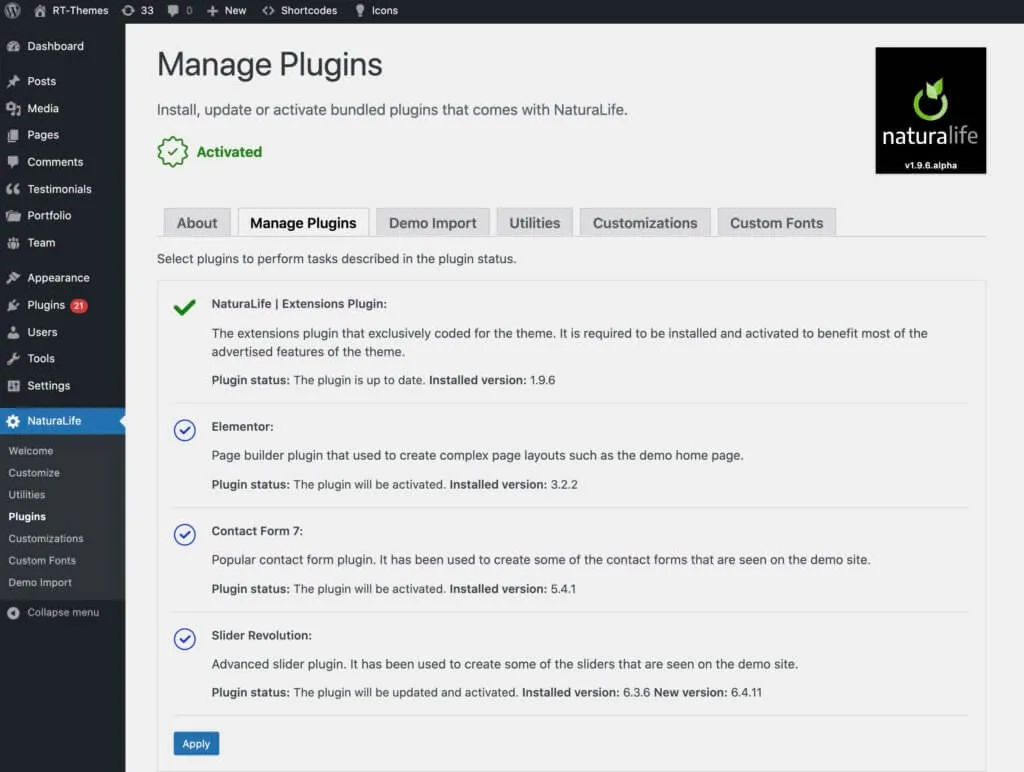
If the Manage Plugins tool does not work for you, update the plugins manually. Make sure your user account is allowed to install and update plugins.
Requirements
Section titled “Requirements”BusinessLounge needs PHP 8.2.35 or newer and a current WordPress release. The latest version is tested with WordPress 7.1 and PHP 8.4.
If you see errors during uploads, demo imports, or when you save the Customizer or a page builder page, raise the PHP memory limit, the maximum upload and post size, and the maximum execution time. Raise the PHP memory limit and upload size shows how. If you cannot change php.ini yourself, ask your hosting company.